Auto captions can turn a silent scroll into a watched clip. But the first transcript is only a draft. You still need to fix names, check timing, and keep text clear of platform buttons.
This workflow shows how to add captions automatically to short videos, then shape them for TikTok, Instagram Reels, and YouTube Shorts.
Step 1: Choose Your Short Video and Caption Workflow
To add captions automatically to short videos, start with the source clip and the job it needs to do. A talking-head clip needs accurate speech text. A product clip may need short text beats that explain what viewers see.
Pick the video before you pick the caption tool. Check the audio first. Is the voice loud enough? Does music cover key words? Are there several speakers? These details affect the transcript more than the tool name does.
If you're making the clip with AI, Seedance Studio can generate a vertical video from a prompt. You can also upload reference images, clips, or audio when the subject needs to stay consistent. We recommend generating the visual first, then moving the file into a caption editor.
A simple workflow looks like this:
- Set the frame to 9:16 for vertical social video.
- Keep the spoken message short and focused.
- Export a clean video with clear audio.
- Generate captions in your editing tool.
- Review every word before you burn captions into the file.
Good framing saves work later. Keep the face or product near the center. Leave room above or below the main subject for text. The advice in this guide to make short videos that get views follows the same rule: decide the format before you build the clip.
There is a real price versus control trade-off. A research sample of caption tools found that full-edit products often begin around $15 to $30 per month. Rev.com AI was listed at $0.12 per minute, but its caption workflow had no editing flexibility. A cheap first pass is useful when the transcript is simple. It becomes costly when you need to fix many lines by hand.
Choose full editing when the clip has names, slang, several speakers, or a paid message. Choose a fast low-cost transcript when you only need a rough text draft.
Step 2: Upload the Video and Generate Captions Automatically
Now upload the short video and generate captions automatically. Use the original file if you have it. Repeated exports can soften speech and make words harder for a speech model to hear.
Open your caption tool and import the video. Select the spoken language before you start. If the tool asks whether you want subtitles, captions, or a transcript, choose captions for text that will appear inside the video.
Wait for the first pass to finish. Don't style anything yet. Read the raw transcript while the audio is fresh in your mind. This makes errors easier to spot because you can compare each line with the sound.
Language support varies widely across caption tools. In one review sample, only 41% of products clearly reported their language support. Among those products, the reported average was 60.6 languages, with a median of 53.5. That gap matters if you publish the same clip for a global audience.
Don't assume that a language list means equal accuracy. A tool may support a language but struggle with accents, mixed speech, or local names. Test a short sample before you process a large batch.
For a TikTok-first workflow, keep the caption pass tied to the video format. The steps in this guide to make TikTok videos with AI put 9:16 framing before generation. That order helps because captions need a safe area, and the safe area depends on the frame.
When the tool finishes, save the project before you edit. Some editors let you change the transcript later. Others only let you change the burned-in text before export. If you close the project too soon, you may lose the timing data.
Don't trust the first result just because every word has text below it. Automatic captions are a draft. The next step is where quality is won.
Step 3: Review the Transcript, Timing, and Speaker Words
Review the transcript before you style captions. A well-designed caption with the wrong word still damages trust.
Play the video from the start and follow the text line by line. Fix proper names first. Speech tools often misread brand terms, street names, acronyms, and slang. Then check numbers. A wrong price or date can change the meaning of a short ad.
Next, check the timing. A caption should appear as the speaker says the words. If the text arrives early, viewers may read ahead and lose interest. If it arrives late, they may see the punchline before the setup.
Look for these timing problems:
- A line stays on screen after the speaker has moved on.
- Two caption blocks flash during one short phrase.
- A pause splits a sentence in the wrong place.
- A new speaker starts before the old line disappears.
Word-level timing is useful when your editor supports it. It lets each word appear close to the moment it is spoken. It also supports active-word effects, where one word changes color as the speaker says it.
Speaker labels need care. Add them only when the viewer could confuse who is talking. For a quick two-person exchange, a small name label may help. For a single speaker, labels add clutter.
If the audio has music, lower it during speech before you regenerate captions. You may get a better transcript without changing the video's final sound mix.
Read the full caption track once with sound off. This catches lines that are too long or too quick to read. It also shows whether the story still makes sense when the viewer never hears the voice.
For accessible color choices, make sure text remains readable against its background. White text needs a dark outline, glow, or panel when the background changes. Don't wait until export to find out that text vanishes over a bright shirt.
When the transcript is correct, lock it or save a clean version. Styling comes next.
Step 4: Style Captions for TikTok, Reels, and YouTube Shorts
To add captions automatically to short videos that people can read, style the text for a small phone screen. The words need clear contrast, short groups, and enough space around them.
Start with a bold sans-serif font. Thin fonts disappear over moving footage. Serif and script fonts can look fine on a desktop but fail at thumbnail size.
Choose one of two basic layouts:
- Use one to three large words for a fast, high-energy clip.
- Use four to seven words per line for calmer speech.
Never place a full paragraph on screen. Break speech at natural beats. A short caption group gives the viewer time to watch the action while reading.
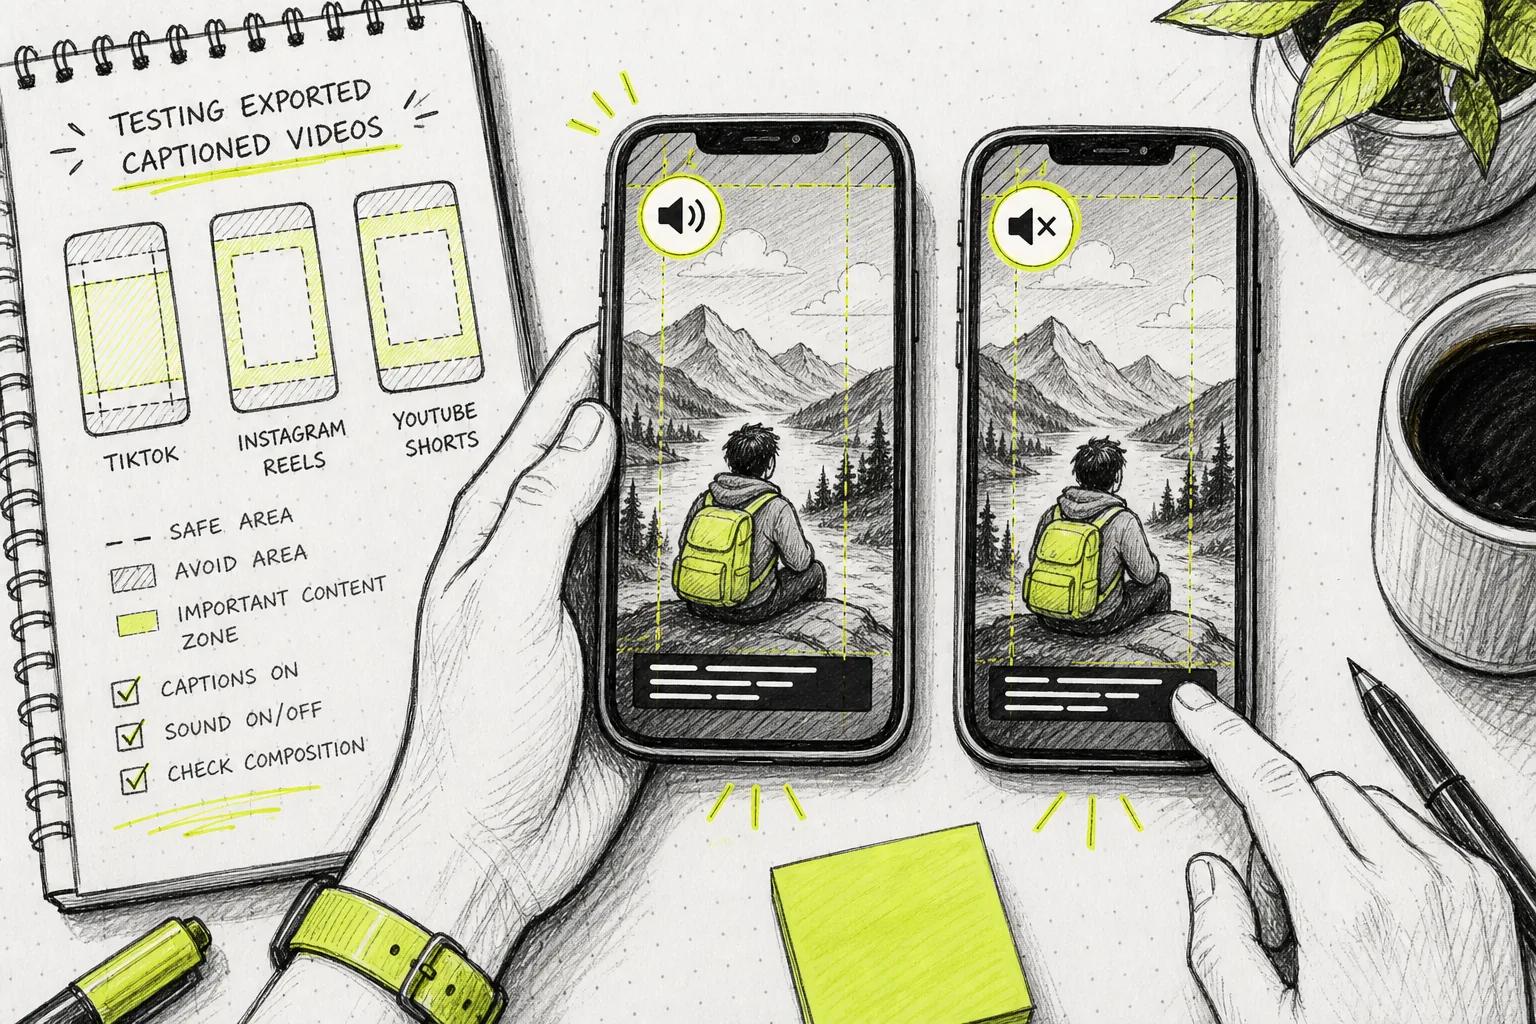
Keep text in the upper or center third of the frame. TikTok buttons and captions sit near the bottom and right side. Reels and Shorts also place controls over the video. A safe margin of about 8% to 12% from each edge helps the file survive cross-posting.
Watch the face. Captions over a speaker's mouth feel careless. Put the words above or below the face based on the shot, not on one fixed screen position.
Default to white text with a dark outline or soft panel. The definition of closed captioning centers on making spoken content available as text, but good social captions also need to stay readable over motion. Contrast comes first.
Use color with restraint. Highlight a key noun, number, or punchline. If every word has a bright color, none of them stands out. A small accent, such as yellow, can guide the eye without turning the screen into a light show.
Add a hook card only when it earns its space. A short statement in the first few seconds can explain the promise of the clip. Keep it brief. The hook should support the spoken idea rather than repeat a long title.
Seedance Studio can help at the visual creation stage when you need a fresh 9:16 clip with consistent characters or native sound. Add the captions after export so you can control the words and safe area in your editor.
Before you move on, preview the video on a phone. Desktop playback hides problems that show up on a small screen.
Step 5: Export, Test, and Publish the Captioned Video
Export only after the captions pass a phone test. The final file should look right with sound on and still make sense with sound off.
Burned-in captions are part of the video image. They look the same when you post the file on different apps. Platform-generated captions can change position or sit under interface controls. The trade-off is permanent text, so fix the transcript before rendering.
Export a vertical 9:16 file for TikTok, Reels, or Shorts. Use the highest quality setting your workflow supports. Then open the exported file on the device where most viewers will watch it.
Run this check in order:
- Watch the whole clip with sound on.
- Watch it again with sound off.
- Check the first frame for a clear reason to keep watching.
- Look for captions under buttons or near the screen edge.
- Check names, numbers, punctuation, and speaker changes.
- Confirm that the final file has the right frame shape and no unwanted watermark.
Pause at the first two seconds. Can you understand the topic without hearing the voice? If not, shorten the opening caption or move the key idea earlier.
Next, test the file after uploading it as a draft. Each app may apply its own crop or interface overlay. Don't publish until the caption safe area still works inside the draft preview.
If you're publishing an AI-generated clip, review any disclosure setting the platform requires. Also check that your captions don't claim something the video cannot prove.
The workflow in this guide to make YouTube Shorts with AI follows the same final habit: watch the exported file on a phone before posting. A clean preview is not enough.
Keep the project file and the clean video in separate folders. If you find a typo after publishing, you can fix the caption track without rebuilding the whole clip. Small file habits save time when one video becomes several posts.
FAQ
How do I add captions automatically to short videos?
Upload the video to a caption editor, select the spoken language, and run its automatic transcription. Then correct the text, fix timing, style the captions, and export a burned-in version. Always watch the result with sound off. That test shows whether the words carry the message by themselves.
Are auto captions accurate enough for TikTok?
Auto captions can work well for TikTok, but you should edit them before posting. Check names, slang, numbers, and words spoken over music. Short videos move fast, so one wrong word can change the joke or the offer. Use a clean audio track and preview the final caption position inside a TikTok draft.
Should I burn captions into short videos?
Burn captions into the video when you want the same text to appear across TikTok, Reels, and Shorts. Burned-in text stays in place after cross-posting, but you can't edit it after export. Save the transcript and project first, then render only after every word and timing choice looks right.
Where should captions go on vertical videos?
Place captions in the upper or center third of a vertical video, with space from each edge. Keep them away from the speaker's mouth and the main product detail. The bottom and right side often contain app controls. Preview the clip on a phone because safe space can change with the shot.
Can Seedance Studio add captions to AI videos?
Seedance Studio is best used to generate the short video before the caption step. We let you type a prompt or upload references to make a clip with camera direction, consistent characters, and native sound. Export that clip, then use a caption editor to transcribe and style the spoken words.
Conclusion
Use automatic transcription for speed, but treat it as a first draft. Generate or choose a clean vertical clip, correct every line, keep text in the safe area, and test the export on your phone. If you need a fresh AI video first, create a free account with Seedance Studio, then add captions in the editor that gives you the control your post needs.