
Making AI video shorts used to mean wrestling with clunky editors and expensive software. Now you can go from a text prompt to a finished 9:16 vertical clip in minutes, ready to post on TikTok, Reels, or YouTube Shorts. This guide walks you through every step, from picking the right tool to formatting your final export for each platform.
Step 1: Pick the Right AI Video Tool for Shorts
Not every AI video tool is built for short-form content. Some are designed for long-form ads or cinematic projects. What you need for shorts is different: fast generation, 9:16 vertical output, and ideally a free tier so you can test before you pay.
We recommend Seedance Studio as your starting point. It runs on Seedance 2.0, currently ranked #1 for text-to-video and image-to-video generation. You type a prompt or upload reference images and clips, and it returns a finished video with camera direction, consistent characters, and native audio already mixed in. No download, no waitlist. The free tier is real , no credit card required.
That matters more than it sounds. Across 56 AI video platforms surveyed in July 2026, only one had a genuine free tier with no watermark tricks buried in the fine print. Most tools that advertise "free" either cap you at 480p, stamp a watermark on exports, or require a card upfront. Seedance Studio's flat paid plan starts at $14/month, which sits well below the $36 average starting price across the market.
Other tools worth knowing about: Kling 3.0 scores high on visual fidelity and benchmark tests, but it's limited to 1080p vertical and has no avatar capability. Runway is strong for cinematic motion control. Higgsfield has a distinctive cinematic aesthetic with preset-driven direction. For a fuller breakdown of how these compare, the best AI video generator tools comparison for 2026 covers the key differences side by side.
For shorts specifically, the deciding factors are vertical format support, generation speed, and whether the tool handles audio in the same pass as the video. Seedance Studio checks all three.
Step 2: Write a Prompt That Gets Results
A weak prompt gets a generic clip. A specific prompt gets something you can actually post. The difference isn't length , it's the right details in the right order.
Use this structure every time:
- Subject:who or what is in the frame, described in specific physical detail
- Action:what they do, not vague movement but a named action
- Setting:where the scene takes place, including time of day
- Camera move:slow push in, orbit shot, handheld close-up, dolly forward
- Lighting or style:warm morning light, neon-lit, overcast, cinematic
- Sound or dialogue:ambient sound, a spoken line in quotes, background music feel
- Constraints:aspect ratio, duration, no visible text
Here's a weak prompt: "a person walking in a city." Here's a strong one: "A young woman in a yellow jacket walks through a rain-soaked Tokyo street at night, camera tracking alongside her at shoulder height, neon reflections in puddles, 9:16 vertical, 8 seconds, ambient city sound." The second one gives the model something to work with.
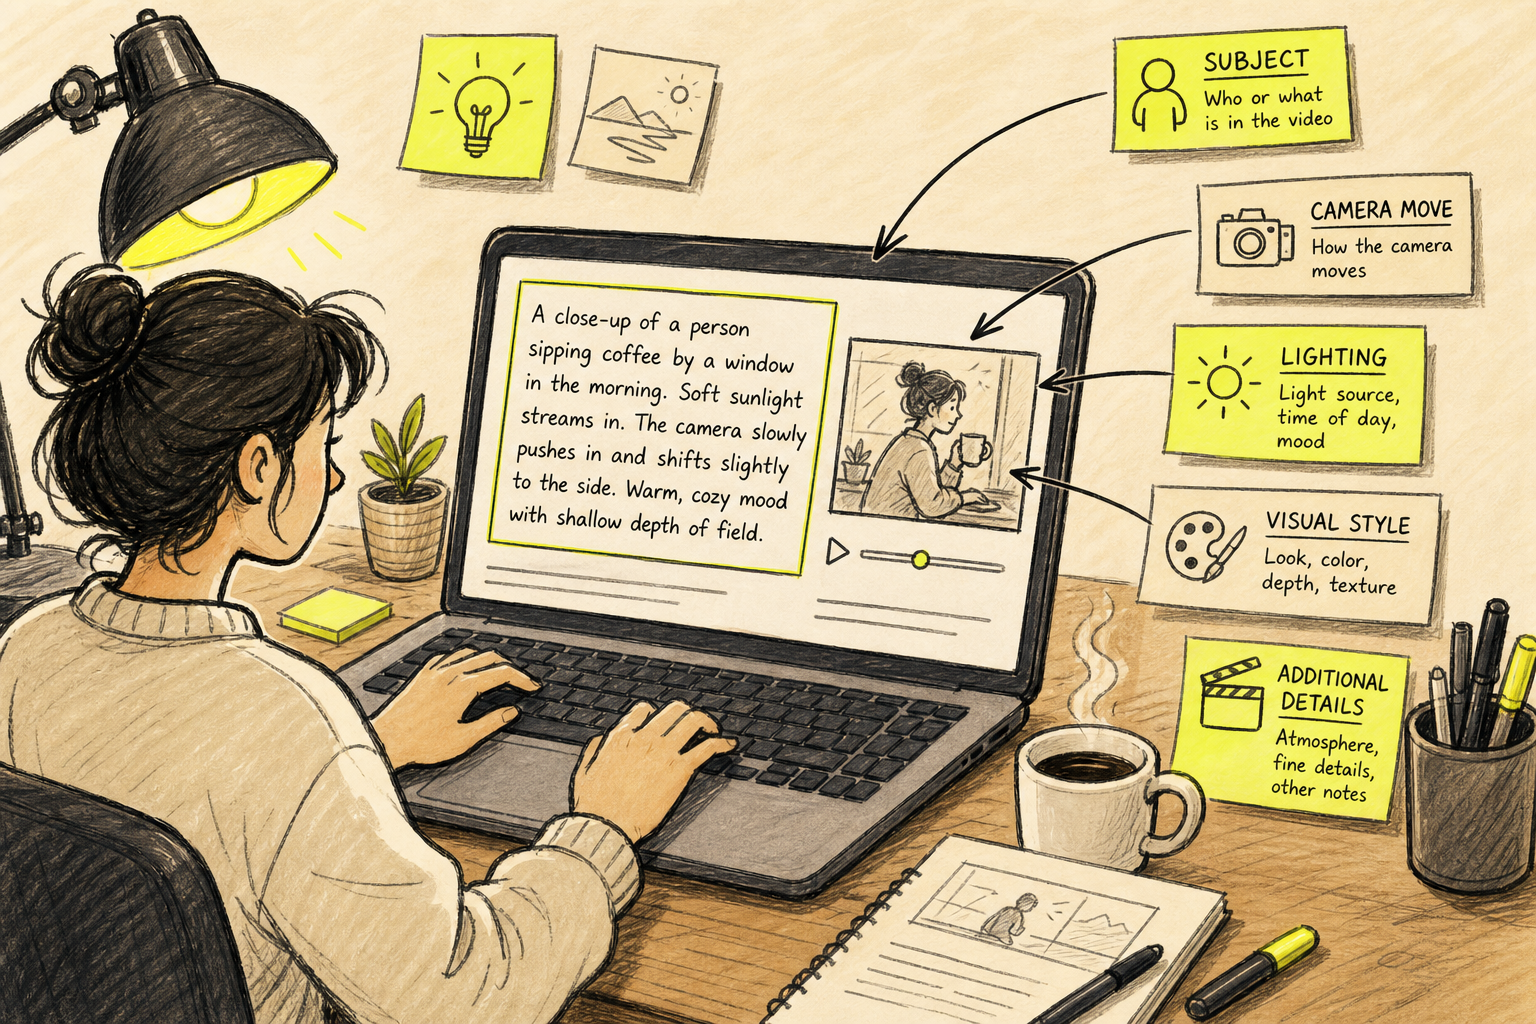
Seedance 2.0 understands plain language but responds best to film language. Words like "tracking shot," "dolly forward," "Hitchcock zoom," and "handheld feel" produce noticeably better camera movement than generic descriptions. You don't need film school , just name the move you want.
Keep dialogue short. If you want a character to speak, put the line in quotes inside the prompt. Seedance Studio generates lip-synced audio in the same pass as the video, so there's no separate audio step. A 6-word spoken line works better than a paragraph.
One more rule: write for the first second. Vertical 9:16 is the format that fills the screen without black bars on short-form platforms, and viewer retention data consistently shows the opening frame determines whether someone keeps watching. Your prompt should describe a visually strong first frame, not a slow build.
If you're turning a written script into video, the workflow for converting an AI script to video in minutes walks through how to break a script into individual shot prompts before generating.
Step 3: Generate Your AI Video with Seedance Studio
Open Seedance Studio in your browser. No install. Sign up free , no card needed. When the studio loads, Seedance 2.0 is already selected as the default model.
Paste your prompt into the text field. Before you hit generate, set three things:
- Aspect ratio:9:16 for TikTok, Reels, and YouTube Shorts. 16:9 for horizontal YouTube. 1:1 for feed posts.
- Resolution:480p on the free plan. 720p, 1080p, and 4K on paid plans. Use lower resolution to test your prompt, then render your final keeper at high quality.
- Duration:4 to 15 seconds. For shorts, 5 to 10 seconds is the sweet spot. Shorter clips generate faster and use fewer credits.
Hit Generate. Rendering takes a moment , long enough to check your phone, not long enough to make coffee. The finished clip lands in your media gallery with audio already mixed in.
Watch the whole clip before you do anything else. Check four things in order: did the camera move the way you described, is the character consistent throughout, does the audio sync to the action, and are there obvious errors like extra limbs or objects blinking in and out. If something's off, tweak one part of the prompt and regenerate. Don't rewrite the whole prompt , isolate the problem.
Free-plan exports are 480p with a watermark. Paid plans remove the watermark, unlock higher resolutions up to 4K, and include a commercial license for anything you publish. For a full walkthrough of the interface and settings, the guide on how to use Seedance 2.0 to make your first AI video in 5 steps covers every control in detail.
Step 4: Use Images or Clips as a Starting Point
Text prompts alone get you far. But if you have a product photo, a character image, or a reference clip, you can lock in visual consistency across every short you make. This is where AI video generation shifts from "pretty cool" to genuinely useful for content series.
Seedance Studio accepts up to 12 reference assets per generation: images, video clips, and audio tracks. You tag each one in your prompt using the @ mention system, and you tell the model what role each asset plays , character appearance, scene background, camera style, or audio rhythm. That specificity is what keeps your character looking the same across 10 different clips.
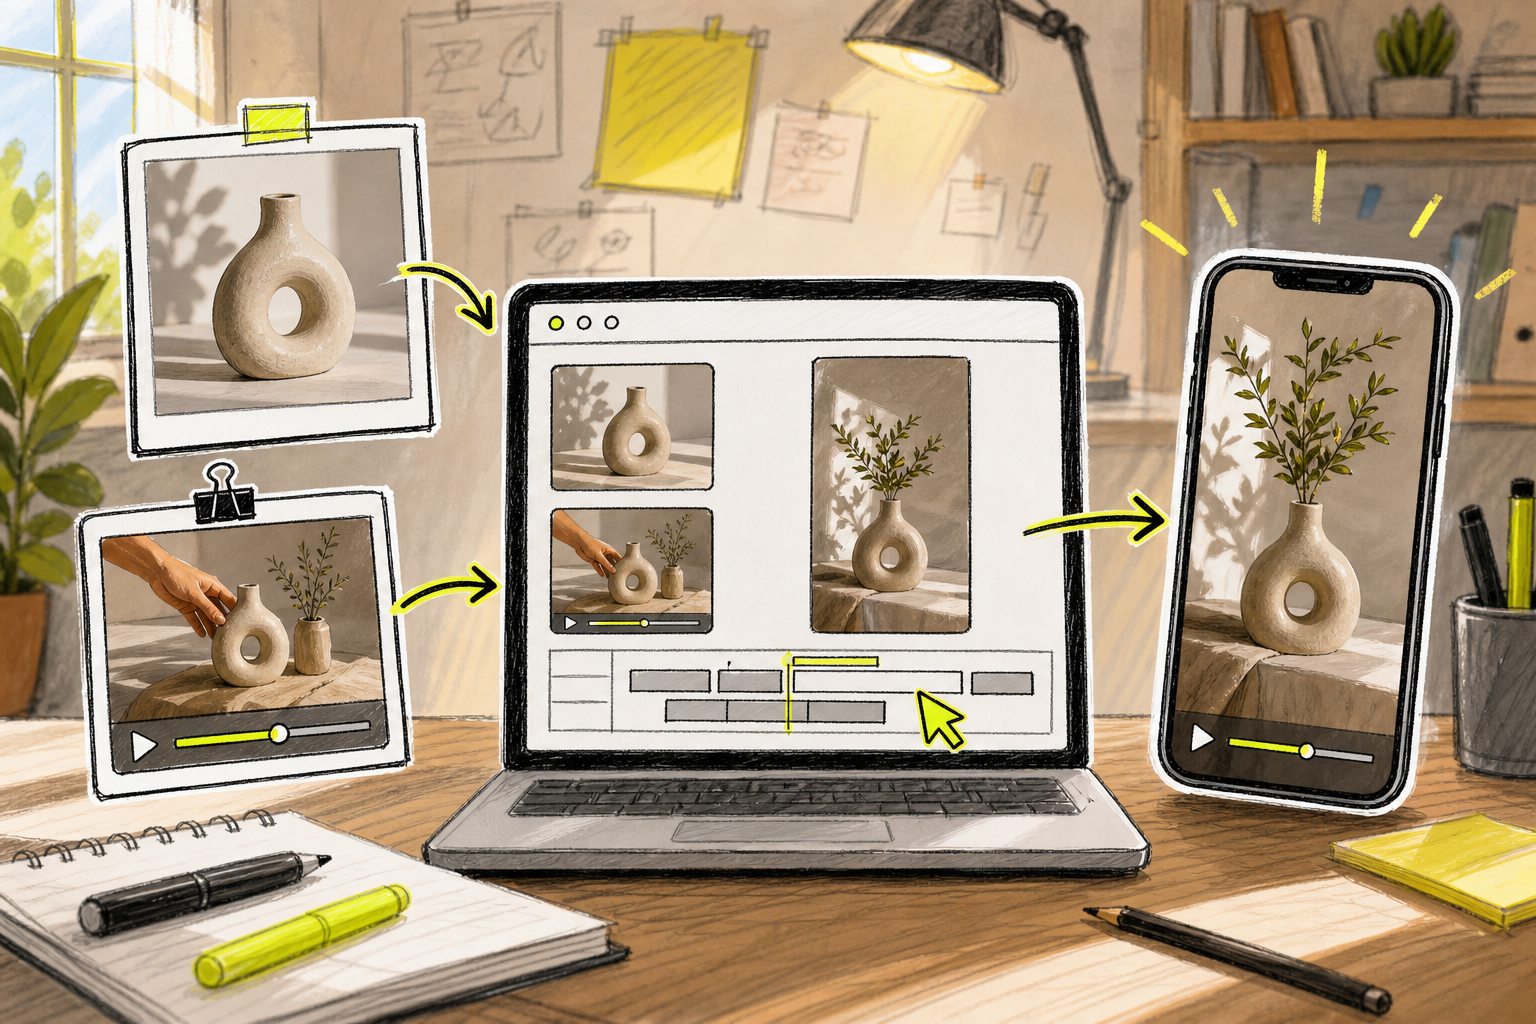
Here's how to prepare your reference assets before you upload:
- Character images:Use a clear, well-lit shot. Front-facing works best for face consistency. Avoid busy backgrounds that compete with the subject.
- Location images:One establishing shot showing the full environment is usually enough. The model reads lighting, color, and spatial layout from it.
- Video clips:Short clips work well for showing a specific camera move you want replicated , a whip pan, an orbit shot, a slow dolly.
- Audio files:MP3 or WAV between 2 and 15 seconds. Use this for beat-sync content or to set a specific sonic mood.
In your prompt, tag each asset by name and describe its role. Something like: "@character1 walks through @location1, tracking shot, morning light, 9:16, 8 seconds." The model knows @character1 is the person and @location1 is the background , not the other way around.
This reference system is especially useful for product demos and UGC-style shorts. If you want to go deeper on the image-to-video side of this workflow, the guide on how to use a free image to video generator covers the full process including motion prompts and output settings.
Step 5: Format and Optimize Your Short for Each Platform
The same clip formatted wrong for each platform will underperform. Each platform has different specs, safe zones, and algorithmic preferences. Here's what matters for the three main short-form channels:
| Platform | Aspect Ratio | Recommended Resolution | Max Duration | Key Watch-Out |
|---|---|---|---|---|
| TikTok | 9:16 | 1080x1920px | 10 min (upload); 60 sec for algorithmic push | UI buttons cover bottom 20% — keep key visuals centered |
| Short-form social platforms | 9:16 | 1080x1920px | Varies by platform | Like/Save buttons cover up to 30% of screen — use safe zone |
| YouTube Shorts | 9:16 | 1080x1920px | 3 min (vertical clips categorized as Shorts) | Only 9:16 fills the screen without black bars |
, TikTok's algorithm actively prioritizes 9:16 video , uploading in any other ratio means the platform adds padding, which reduces how much of the screen your content fills and signals to the algorithm that the content wasn't made natively for the platform.
When you export from Seedance Studio, select 9:16 before you generate. That's faster than cropping after the fact, and the model composes the shot correctly for vertical framing from the start. Export as MP4 at 1080p minimum for anything you plan to post publicly.
One more thing: captions. A large share of viewers watch short videos on mute, especially on mobile. Add captions before you post , TikTok, Reels, and YouTube Shorts all have built-in auto-caption tools. Review them for errors before publishing. For creators who want to go deeper on sound-first workflows, the guide on using an AI video generator with sound covers audio sync and voice-over options in detail.
Tips for Making Your AI Shorts Stand Out
Generating a clip is the easy part. Getting people to watch it past the first two seconds is the actual challenge. A few things make a real difference.
Hook in the first frame., short-form video is the top ROI-driving content format , but 71% of viewers decide within the first few seconds whether to keep watching. Your opening frame needs to show something visually interesting immediately. Not a logo. Not a title card. A scene, a face, an action.
Keep it short even when you don't have to.The 15-second sweet spot still outperforms longer clips for most creators. Shorter clips have higher completion rates, and completion rate is one of the signals platforms use to decide how widely to distribute your video.
Use reference consistency for series content.If you're making a series , a recurring character, a product line, a branded format , use the same reference image in every generation. That visual consistency makes your content recognizable in a feed, which builds audience faster than one-off clips.
Test one variable at a time.Make three versions of the same short with different opening frames. Keep everything else identical. After 48 hours, check which version held attention longest and use that format going forward. AI makes this fast , three variations take minutes, not days.
Match the trend, keep your angle.Jumping on a trending audio or format puts your content in front of people already engaging with that topic. But the trend should serve your message. A creator making finance content can use trending audio under a screen recording of a chart , the trend is the entry point, not the whole video.
For creators working on more polished, narrative-driven content, the guide on how to make a cinematic video step by step goes deeper on prompt structure for camera work and scene continuity.
FAQ
Can I make AI video shorts for free?
Yes. Seedance Studio has a genuine free tier , no credit card required , which is rare. Across 56 AI video platforms reviewed in July 2026, only Seedance Studio offered a real no-cost entry point. Free-plan exports are 480p with a watermark. If you need 1080p or 4K without a watermark, paid plans start at $14/month. Most other tools that advertise "free" cap resolution or require a card upfront.
How long should an AI short video be?
For TikTok, Reels, and YouTube Shorts, 15 to 30 seconds tends to perform best for algorithmic reach. Shorter clips have higher completion rates, which platforms reward with wider distribution. When generating with Seedance Studio, 5 to 10 seconds per clip is the sweet spot for testing , you can stitch multiple clips together in a basic editor if you need a longer final video.
Do I need editing skills to make AI video shorts?
No editing skills are needed to make AI video shorts with a browser-based tool. Seedance Studio generates the video, camera movement, and audio in a single pass from your text prompt. You pick your aspect ratio and duration before generating, then download the finished MP4. The only post-generation step most creators take is adding captions, which TikTok and YouTube Shorts both do automatically on upload.
What aspect ratio should I use for AI shorts?
Use 9:16 for TikTok, YouTube Shorts, and other vertical video platforms. It's the only ratio that fills the phone screen without black bars. TikTok's algorithm actively prioritizes 9:16 content over other formats. Set your aspect ratio inside Seedance Studio before generating , the model composes the shot for vertical framing from the start, which gives better results than cropping a horizontal clip afterward.
How do I keep characters consistent across multiple AI shorts?
Upload a clear reference photo of your character and tag it in every prompt using Seedance Studio's @ mention system. The model uses that image to anchor your character's appearance across different scenes, lighting conditions, and camera angles. Use the same reference image for every clip in a series. Seedance Studio supports up to 12 reference assets per generation, so you can lock in character, location, and audio style simultaneously.
Is AI-generated content allowed on TikTok and YouTube Shorts?
Yes, with disclosure. Both platforms allow AI-generated content but require you to label it as AI-made. YouTube has a disclosure toggle in the upload settings for synthetic or altered content. TikTok's monetization programs may have restrictions on content that is entirely AI-generated with no human creative input, so adding your own direction, editing, or voiceover helps. Always check each platform's current content policies before monetizing AI shorts.
Conclusion
The fastest path from idea to posted short is a specific prompt, the right vertical format, and a tool that handles audio in the same generation pass. Seedance Studio covers all three, with a free tier that lets you test before you commit to anything. Open the studio, write one prompt with a named camera move and a clear first frame, and hit Generate. Your first AI short can be ready to post before the trend dies.


