
Most people throw a single sentence at Seedance 2.0 and wonder why the output looks flat. The model is far more capable than that , it just needs the right workflow. This guide walks you through every step, from signing up to exporting a finished clip, so you stop guessing and start publishing.
Step 1: Create Your Seedance Studio Account and Tour the Workspace
Go to Seedance Studio's free plan and sign up with your email. No credit card, no waitlist, no app to install. The whole thing runs in the browser, which means it works on any device you're already using.
Once you're in, you'll land on the main workspace. Seedance 2.0 is the default model in the prompt box , you don't need to hunt for it or activate anything. Spend two minutes clicking around before you generate anything. Notice the aspect ratio selector (16:9 for YouTube, 9:16 for Reels and TikTok, 1:1 for square posts), the duration slider (4 to 15 seconds), and the resolution toggle between 480p, 720p, and 1080p.
There's also a model variant selector. You'll see different model options to choose from. The standard Seedance 2.0 gives you the highest quality. Lower-tier variants cut the credit cost and are perfect for testing ideas before committing to a full generation. We'll come back to those in Step 6.
The upload area at the top of the prompt box is where you'll drop reference images, video clips, and audio files. You can accept up to 9 images, 3 video clips, and 3 audio files per generation. That's the ceiling , but more on why you rarely want to hit it in Step 2.
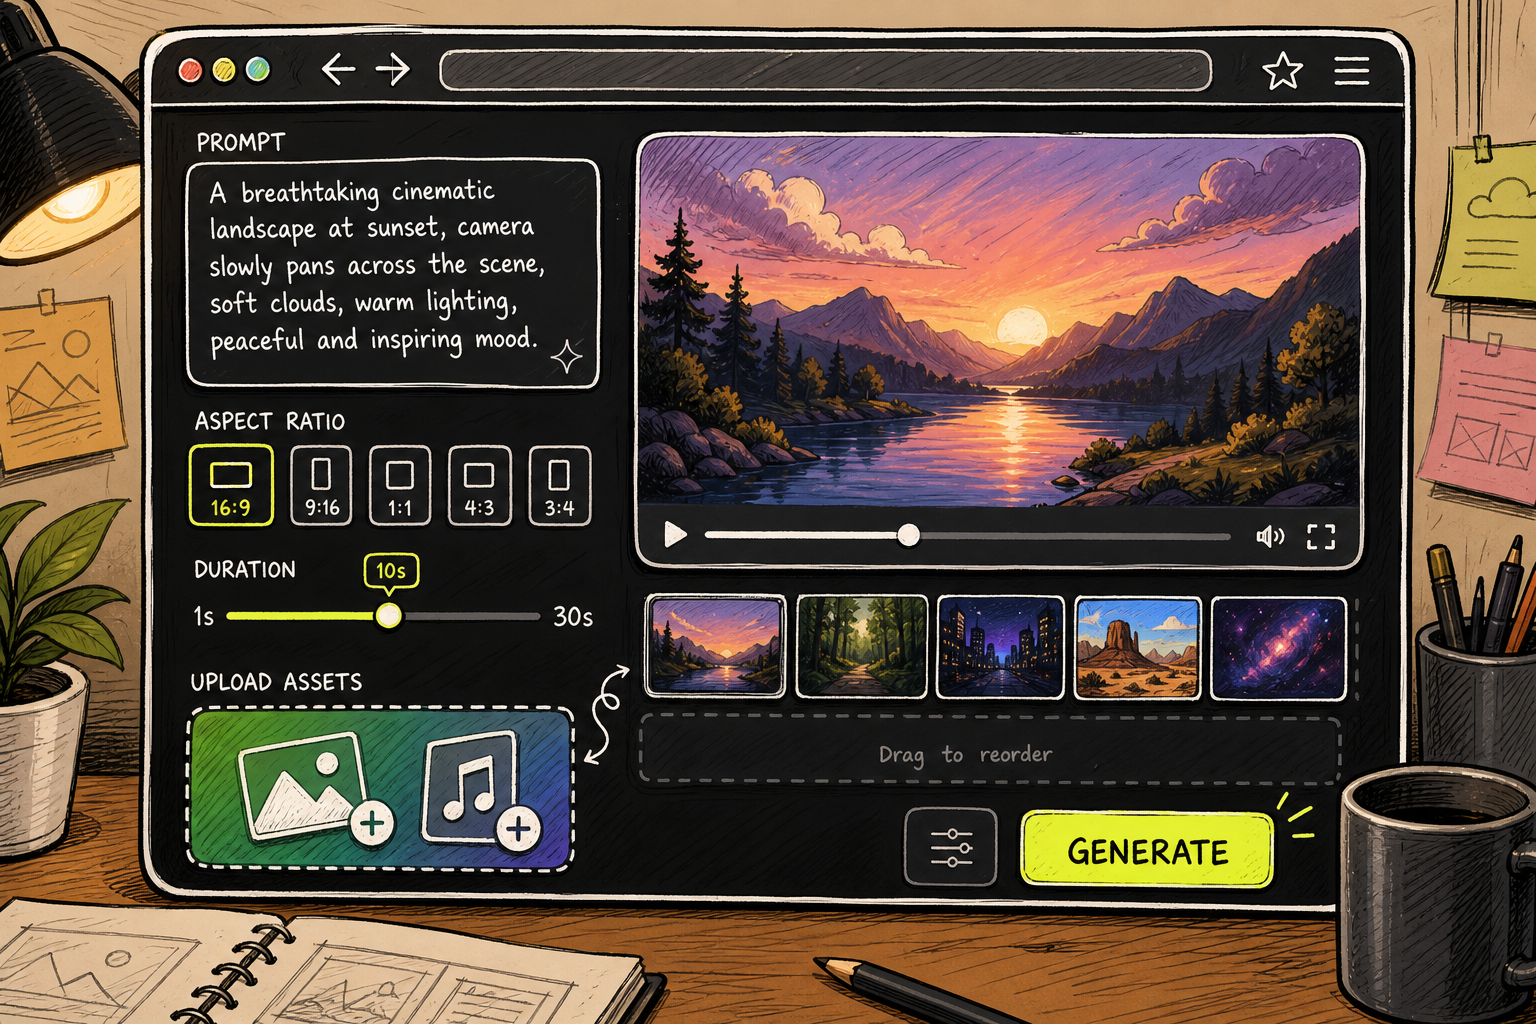
By the time you finish this step, you should have a working account, a mental map of the workspace, and one important habit: always pick your aspect ratio and duration before you write a single word of your prompt. Changing them after you've drafted a detailed prompt can mean rewriting the whole thing.
Step 2: Upload Your Assets and Prepare Your References
This is the step most tutorials skip, and it's exactly why so many first-generation outputs look generic. Seedance 2.0 is a multimodal model, which means it can accept text, images, video clips, and audio at the same time. The quality of what goes in directly shapes what comes out.
Before uploading anything, think about what job each reference is doing. The model can extract character features from an image, camera movement from a video clip, and rhythm from an audio file. But it needs each reference to have a clear, distinct role. If you upload two images that compete for the same job , say, two different faces both claiming to be your main character , the model gets confused and the output drifts.
The recommended limit is 4 to 5 assets total across all types. That's not a technical cap, it's a quality guideline. Using the full asset allowance tends to produce style conflicts and blurry subject identification. One strong image of your character beats four mediocre ones every time.
Here's a usable way to think about asset preparation before you upload:
- Character images: Use clear, well-lit shots. Front-facing works best for face consistency. Avoid busy backgrounds that compete with the subject.
- Location images: One establishing shot that shows the full environment is usually enough. The model reads lighting, color, and spatial layout from it.
- Video reference clips: Short clips (the minimum per clip is a few seconds) work well for showing a specific camera move or piece of choreography you want replicated.
- Audio files: MP3 or WAV, each between 2 and 15 seconds. Use this for beat-sync content or to set a specific mood. Note: audio alone won't generate , it always needs at least one visual reference alongside it.
After uploading each asset, check its eligibility. Not every image passes the model's reference check on the first try. If one comes back ineligible, regenerate or swap in a cleaner version. Getting this right before you write your prompt saves you from burning credits on generations that were set up to fail.
Step 3: Write a Strong Prompt and Set Your Video Parameters
A vague prompt gets a vague video. Seedance 2.0 understands real cinematography language, so use it. The formula that works is: Subject → Action → Setting → Camera move → Lighting or style → Dialogue or sound → Constraints.
Here's the difference in practice. A weak prompt: "A woman walking in a city at night." A strong one: "A woman in a red coat walks along a rain-slicked Tokyo street at night. Slow dolly forward. Neon signs reflect in puddles. Shallow depth of field. She says quietly a line of dialogue. Keep her face sharp throughout."
The second version gives the model a named camera move, a specific lighting condition, spoken dialogue in quotes (which triggers lip sync automatically), and a constraint that tells it what not to break. That last part , the constraint , is the most underused element. Telling the model what to protect does more for your keeper rate than adding extra adjectives.
For multi-shot scenes, use timeline prompting. This means adding timestamps to your prompt so the model knows when each camera change or action should happen. The structure looks like this:
- [0s] Wide shot: the subject stands at the entrance of a warehouse, backlit by cold fluorescent light. Camera is static.
- [4s] Slow dolly forward. The subject turns to face the camera. Medium shot.
- [8s] Close-up on hands. Tension holds. No movement.
, structuring prompts around timestamps significantly increases the chance the model distributes events across the clip rather than cramming everything into a single static frame. End every timeline prompt with a one-line global style note: something like "35mm film grain, warm shadows, anamorphic lens flare" acts as a consistent visual filter across the whole generation.
Seedance 2.0 has a 2,500-character prompt limit. That's enough for a full multi-shot scene. The Seedance 2.0 Prompt Guide breaks down all seven elements of the formula with 21 ready-to-use prompts you can swap your own subject into. Once you've studied the formula, paste your basic idea into the Seedance Studio prompt box and build from there.
Before you hit generate, double-check three settings. First, duration: if your timeline prompt is built for 15 seconds, make sure the slider is set to 15. Second, aspect ratio: pick the format for where the video will live, not what looks nicest in the preview. Third, resolution: 720p is fine for iteration; save 1080p for your final render. A 1080p generation costs roughly double the credits of 720p, so burning through high-res credits while you're still testing prompts adds up fast.
Step 4: Use the Element System for Consistent Characters and Scenes
Character drift is the most common complaint about AI video. You generate the first shot, the character looks great. Second shot, the hair is different. Third shot, the face is slightly off. Seedance 2.0 handles this better than most models, but it still needs help from you.
The key is building a named element set before you start generating. Think of it like a cast list and a location sheet. Each element has one reference image or clip attached to it, and you call it by name in every prompt you write for that project.
Here's a usable setup for a short film project with two characters and one location:
- Character A: Upload a clear front-facing image. Name it [Char_A]. Use this same tag every time she appears in a prompt.
- Character B: Same process. Name it [Char_B]. Build him from a generated character sheet if he doesn't exist as a real person.
- Location: One clean establishing shot of the space. Name it [Location]. Tag it in every prompt where the scene takes place there.
Seedance 2.0 maintains character appearance, clothing details, and scene lighting when you use consistent references across generations. Fine details like hair can still drift slightly from one clip to the next , that's a known limitation at the current state of the model. The fix is to check each generation before moving to the next shot, and regenerate if a detail has drifted too far. It's cheaper to catch drift early than to rebuild consistency at the edit stage.
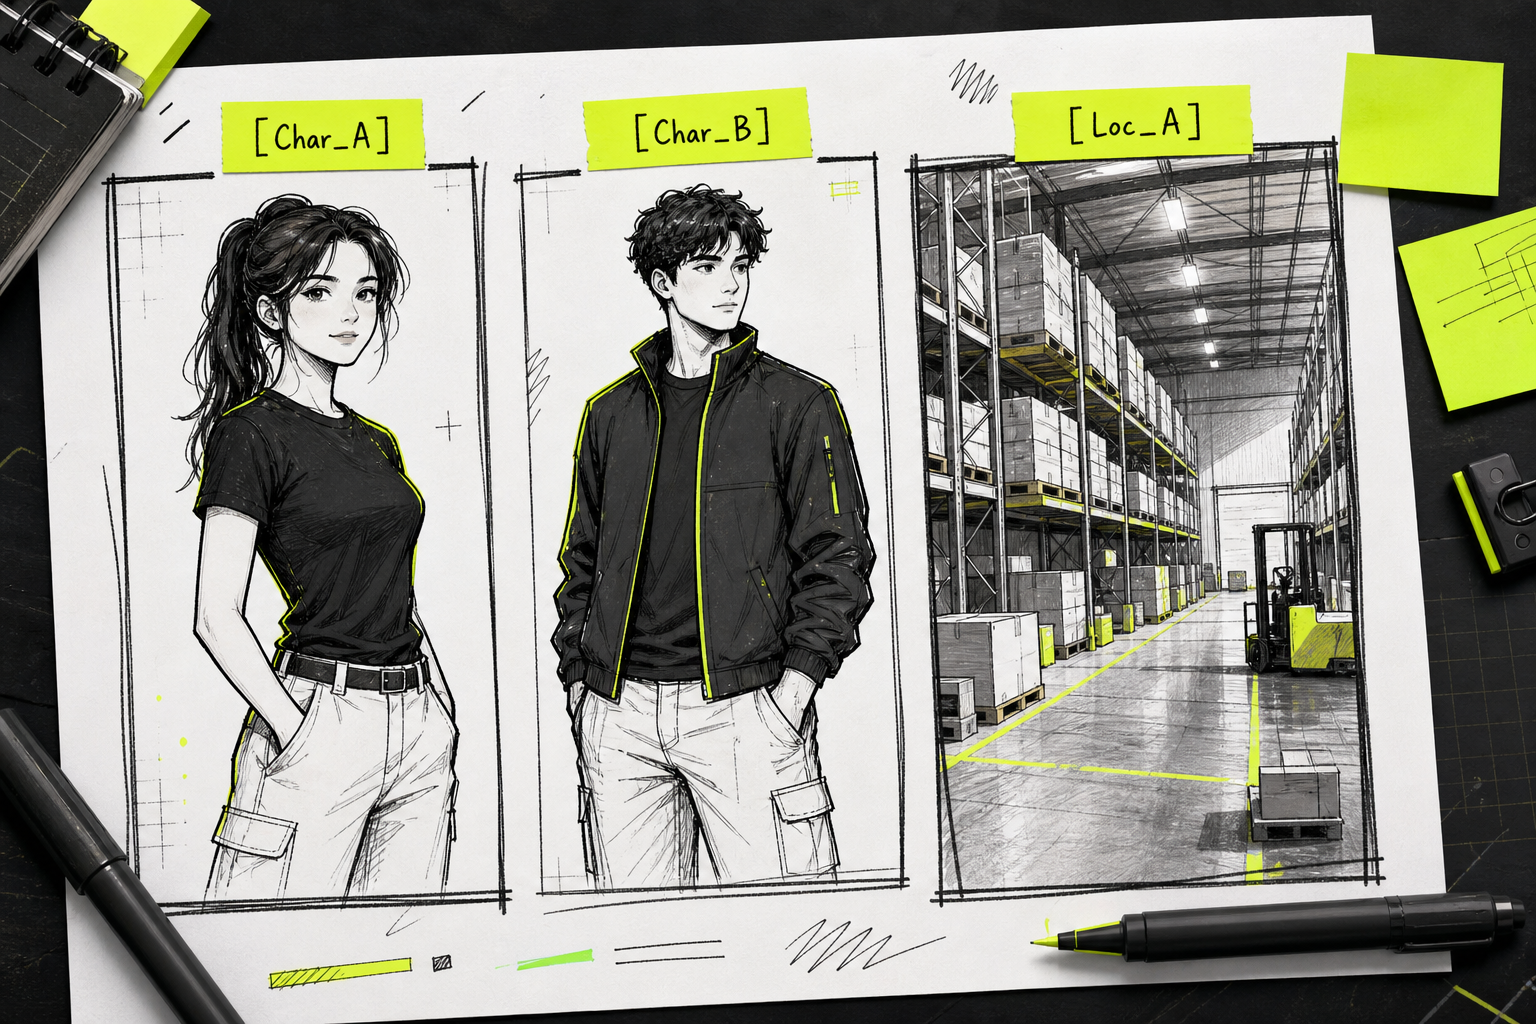
, [Char_B], and [Location], with arrows pointing to a video frame showing them together. Accent color #E5FF45 highlights the tag labels. Alt: Seedance element system showing character and location reference panels tagged for consistent AI video generation.]
For projects where you want to replicate specific choreography or camera movement from existing footage, upload a short video clip as a reference and describe what you want borrowed from it. The model extracts motion paths and camera behavior from video references in a way that text alone can't fully specify. A three-second clip of a specific camera arc is worth a paragraph of description trying to explain the same move.
One rule that applies regardless of how many elements you build: keep the subject noun consistent throughout every prompt in the project. If you call her "the woman" in one prompt and "the dancer" in the next, the model may treat them as different people. Pick one name and use it every time.
Step 5: Generate, Review, and Export Your Video
Hit generate. Most clips come back in under 60 seconds at 720p. At 1080p the wait is a little longer, but still measured in seconds to a minute or two, not in hours.
When the clip loads, watch the whole thing before you do anything else. Check four things in order. First, did the camera do what you asked? Second, is the character consistent with the reference? Third, does the audio sync to the action? Fourth, are there any obvious errors , extra hands, a distorted face mid-motion, objects that blink in and out?
If the clip has one small issue but everything else is right, don't scrap it. Adjust the specific part of the prompt that caused the problem. Add a constraint that protects the thing that broke. Then regenerate. It's faster to iterate on a near-miss than to start from scratch.
If the clip is genuinely bad across the board, look at your prompt structure first. Vague camera instructions, missing timestamps for multi-shot scenes, and overloaded reference sets are the three most common causes of a poor first generation. Fix the weakest element and try again.
For export, Seedance Studio delivers finished clips at up to 1080p (or up to 4K depending on your plan). Download directly from the workspace. If you need 4K for a professional deliverable, some creators run their 1080p Seedance output through an upscaling tool afterward , going from 720p or 1080p to 4K in post is a common workflow for commercial projects.
For social content, the clip is usually ready to post straight from the export. Pick the right aspect ratio at the generation stage and you skip the crop step entirely. Vertical 9:16 for TikTok and Reels, 16:9 for YouTube, square for feed posts.
Step 6: Manage Credits and Save More From Every Generation
Credits are what separate a sustainable workflow from one that burns out after a week. Every generation consumes credits. Longer clips cost more. Higher resolution costs more. The standard Seedance 2.0 model costs roughly double what the lower-tier model does per generation.
The table below shows how to think about which model to use at each stage of a project:
| Stage | Recommended Model | Why | Resolution |
|---|---|---|---|
| Testing prompts and framing | Lower-tier model | Reduced credit cost; good enough to judge composition and camera move | 480p or 720p |
| Refining characters and consistency | Lower-tier model | Lets you iterate without burning flagship credits | 720p |
| Final render for publishing | Seedance 2.0 (standard) | Highest fidelity, tightest audio sync, best character consistency | 1080p or 4K |
| High-volume ad variants | Lower-tier model | Volume is the job; quality is strong enough for most social ads | 720p |
The two-stage workflow is the single biggest credit-saving habit you can build. Draft on a lower-tier model until the prompt and references are behaving exactly how you want. Then run the identical prompt and references on standard Seedance 2.0 for the final render. You pay full price only once, on the generation that actually ships. If you're unsure which model tier fits your project, the Seedance 2.0 Mini vs Fast vs Standard breakdown covers the specs and costs side by side.
A few more habits that stretch your credits further. First, get the prompt right before you increase resolution , a bad prompt at 1080p wastes more than a bad prompt at 480p. Second, use the rerun button only when you've made a meaningful change to the prompt or references. Rerunning the same prompt rarely produces a dramatically different result. Third, shorter clips use fewer credits per generation. If you're building a multi-shot scene, generate each 10-15 second segment separately rather than trying to fit everything into one long generation where issues compound.
Seedance Studio's paid plans start at $14/month and add more generations, higher resolution, watermark-free exports, and a commercial license. The free tier is real and useful for learning the workflow , a few videos a month at 480p with a watermark. If you're posting content for clients or selling the output commercially, upgrading makes the math work quickly. When you're ready to scale video production programmatically, the Seedance API lets you submit generation jobs directly from your own code using the same Seedance 2.0 model.
Operational Use Cases: What You Can Make With Seedance
Knowing the workflow is one thing. Knowing what to point it at is another. Here are the use cases where Seedance 2.0 genuinely performs, based on how creators are using it right now.
Product demos and ads: Upload a product photo as a reference image. Write a prompt that describes the product in motion , rotating on a surface, being picked up by a hand, placed in a real environment. The model animates it with natural physics and generates matching audio. Teams that used to need a full shoot day can iterate on a product spot in an afternoon.
Short films and multi-shot scenes: Use the timeline prompting method from Step 3 to build a complete scene across multiple generations. Establish a character set, keep your reference tags consistent, and string the segments together in a video editor. The model holds scene atmosphere and character appearance well enough to cut between shots without jarring inconsistency.
Social content and trend videos: Generate vertical 9:16 clips sized for TikTok and Reels. Seedance 2.0 is fast enough that you can test a concept, see the output, and post the same day. If you want to build an entire content calendar around your AI video clips, an AI caption and copy writing tool can help you draft the captions and thread copy to accompany each video , keeping both the visual and the text side of your social workflow moving at the same pace.
Educational explainers and classroom content: Animate a concept that's hard to photograph. Historical reconstructions, abstract science visualizations, and animated diagrams all work well as short Seedance clips. A text prompt describing the concept plus one reference image is usually enough to get a usable explainer clip in a single generation.
Music videos and beat-sync content: Upload your audio track as a reference and Seedance 2.0 matches camera cuts and motion to the beat. This is one of the more technically impressive things the model does. The cuts don't feel random , they land on rhythm. It's genuinely useful for artists who need a visual companion to a track but don't have a production budget.
Multimodal generation models that handle audio and visual output simultaneously represent a significant shift in how short-form video content gets made , moving production from specialist teams toward individual creators with the right tools and workflow knowledge. Seedance 2.0 sits squarely in that category.
Frequently Asked Questions
Is Seedance free to use?
Yes. Seedance Studio has a free tier that lets you generate a few videos a month at 480p with a watermark. No credit card is required to sign up. Paid plans start at $14/month and add more generations, higher resolution up to 4K, watermark-free exports, and a commercial license. The free plan is genuinely useful for learning the workflow before you commit to a paid tier.
How long does it take to generate a video?
Most clips at 720p come back in under 60 seconds. At 1080p the generation takes a little longer, typically a minute or two. The speed depends on the model variant you choose. For a 15-second clip with detailed references, expect 60 to 90 seconds on average at the standard quality setting.
Why does my generated video look different from my reference image?
The most common cause is too many reference assets competing for the same role. Keep your total asset count at 4 to 5 files, each with a distinct job. A second cause is inconsistent subject naming in the prompt , if you call the same character by different names across timestamps, the model may generate an inconsistent character. Tag references explicitly and use the same name for the same subject throughout.
Can Seedance 2.0 generate dialogue and lip sync?
Yes. Put any spoken line in quotation marks inside your prompt and Seedance 2.0 will generate it as spoken dialogue with matching lip movement. It works across English, Japanese, Korean, Mandarin, and several other languages, with mouth movement automatically matching each language's phonetics. You don't need a separate voice generation step , the dialogue comes out of the same generation as the video.
What's the best way to save credits while still getting good output?
Use a two-stage workflow: draft and iterate at a lower resolution setting until your prompt and references produce the right result. Then run the final version on standard Seedance 2.0 at 1080p. You pay full price only on the generation that ships. Avoid running high-resolution generations during the testing phase , a bad prompt at 1080p wastes roughly double what the same bad prompt costs at 720p.
Do I need to download any software to use Seedance?
No. Seedance Studio runs entirely in the browser. There's no app to install and no file to download. It works on any desktop browser. Sign up with your email and start generating from the workspace immediately. There's no waitlist or invite code required to access Seedance 2.0 on the platform.
Start Your First Generation
The workflow comes down to this: prepare clean, tagged references, write a prompt that directs the scene like a cinematographer, and iterate before you ship. That loop produces consistently better output than anything you'll get from a single rushed generation. If you haven't started yet, learn what Seedance 2.0 can do and then open the studio — the free tier gives you enough room to run the full workflow end to end before you spend a dollar.


